I’ve been wanting this sewing pattern forever and finally got it this past month. It’s only available as a paper pattern and it’s shipped from France and I guess maybe that's why I was so hesitant to get it right away. I sure hope things change in the future and that more digital patterns are offered from international pattern companies.
Project details
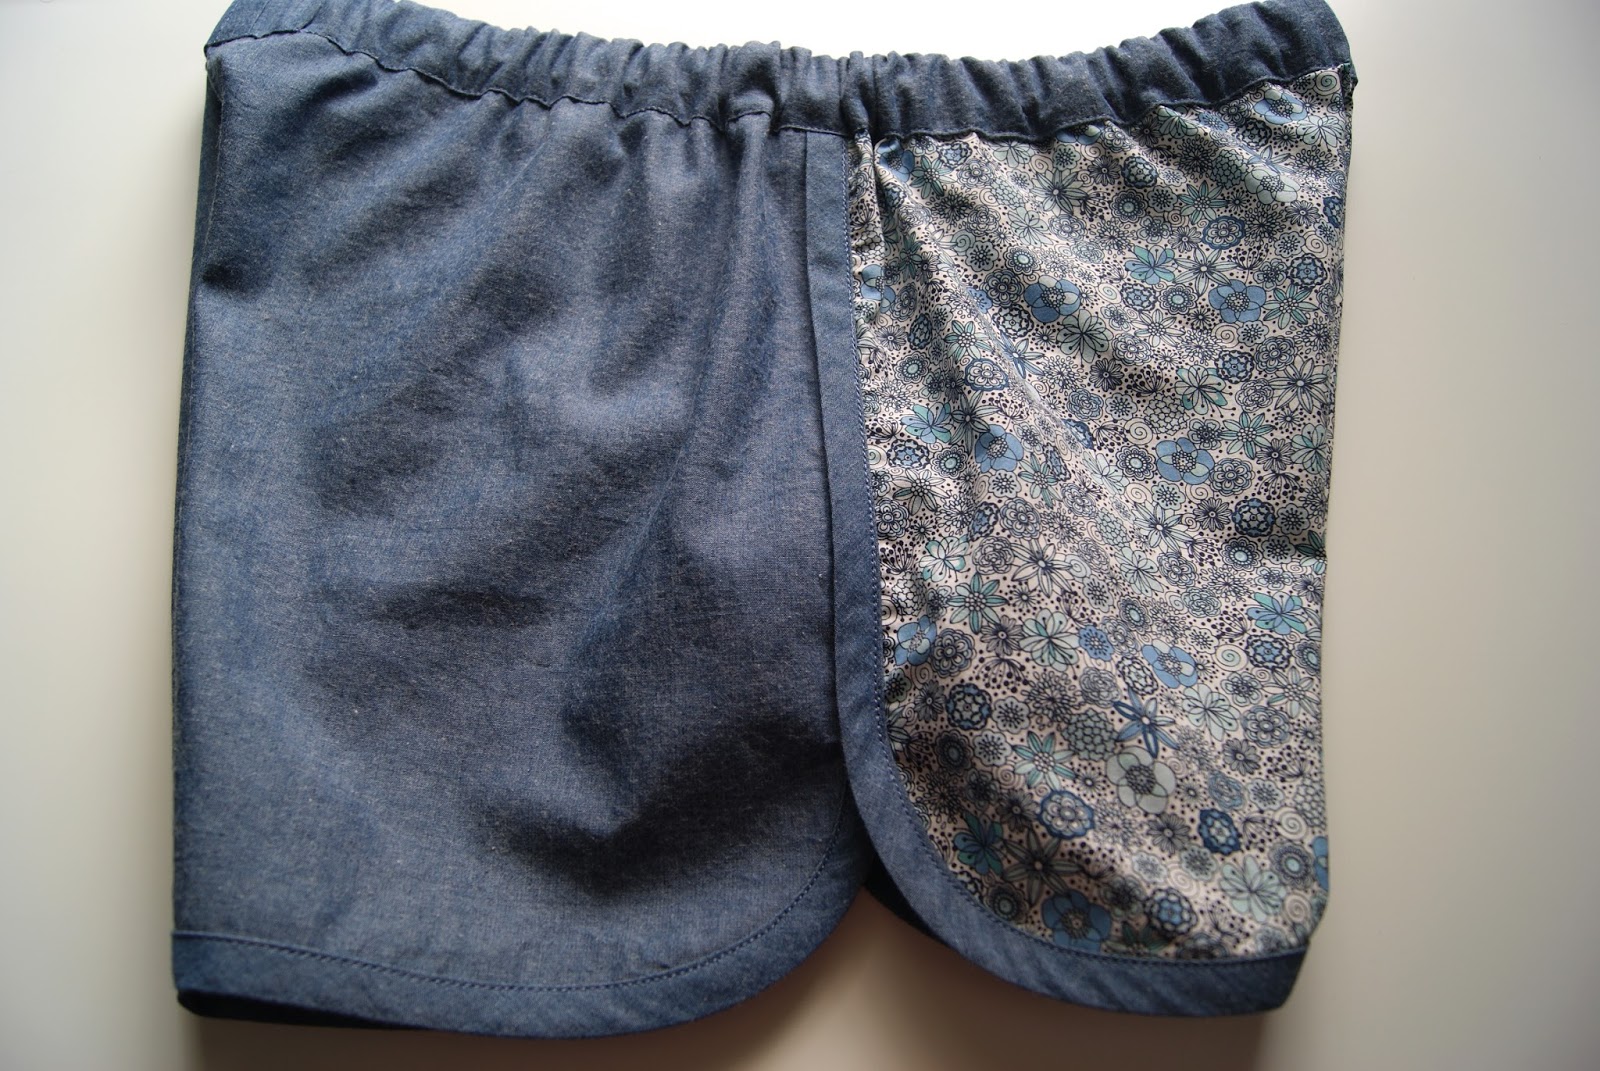
Pattern: Papillon et Mandarine Leon Shorts (sizes 2-10 years) paper pattern in English or en francais.
Size: 6
Fabric: 5/8 yard Interweave Chambray in Khaki by Robert Kaufman from Hawthorne Threads was used for everything: the main fabric, the lining, and all the fabric covered buttons, and very little fabric was left over.
Notions: 1/2 and 5/8 inch fabric covered buttons and a couple of plastic buttons and buttonhole elastic for the back waistband.
There was the option of hand stitching or topstitching certain parts and I started out hand stitching, but then quickly switched to topstitching. Who has time for so much hand stitching? On future pairs I will do all topstitching (that is a guarantee) and there will be several future pairs thanks to the major cute factor! Who can resist these sailor style bloomer shorts all gathered and puffy? And all the adorable little buttons? And they have pockets which are always a big hit.
Being a European (French) pattern the seam allowances are 1 cm (= 3/8 inch) which is smaller than what I’m used to working with which is 1/2 inch. So next time around I make the seam allowances on the leg cuffs to be 1/2 inch because 3/8 inch is just too small and fiddly to work with on a smaller detail like that.
So now C has another pair of khaki shorts for school uniform bottoms (back in July for KCW I sewed up a pair of Clever Charlotte Finch Shorts). I’m so pleased with the final result and the perfect fit! Now I'm off to make the next pair of Leon shorts…
Saturday, September 6, 2014
Sunday, August 31, 2014
City Gym Shorts
Finally some sewing for moi! Last time I sewed shorts, I mentioned I wanted to make myself a pair of these. They are the City Gym Shorts, a free pattern from The Purl Bee.
Project Details:
Pattern: The Purl Bee City Gym Shorts (free pattern)
Size: 35-37 inch hip
Fabrics: London Calling 4 Garden Sketch in blue from Crafty Planet and Chambray Dark Denim from Hancock.
Notes: I went up one size and the fit is a little roomy, perfect as summer pajama shorts which is what I'm using them for. I would definitely sew up more of these, in different sizes, too. It's a great pattern if you haven't tried it yet.
I still want to sew up some more shorts, next up several Leon shorts including khacki for school uniform bottoms.
Sunday, August 24, 2014
No-sew 18-inch Doll Dresses
A few months ago I went to a used clothing sale and bought 34 newborn sized (which fits a 5-8 pound baby) clothing items for $47. So it cost about $1.38 for each item. The intention was to turn them into doll clothes.
First off, these newborn tops (one orange and the other one blue with white dots) became instant 18-inch doll dresses with no adjustments necessary.
Next up, there were these two newborn onsie dresses.
I simply lifted up the skirt part of the dress and cut off the onsie part with a scissors. Just that one quick easy step and they became 18-inch doll dresses. No need to finish the newly cut edges as knit fabric doesn't fray.
The straps on the pink striped dress turned out to be a little bit too long.
So I tucked the straps under in the back and sewed them down using my sewing machine. It fit much better after I did that.
Most of the newborn onsies were made into 18-inch doll t-shirts and nightgowns. The newborn bloomers and pants turned out to be too big for an 18-inch doll, but they do fit a bigger baby doll.
What a deal with each new doll clothing item only costing around $1.38 a piece!
Monday, August 4, 2014
Knock It Off
Heidi over at Elegance & Elephants is hosting her third Knock it Off series. Today it's my turn to share my knock off. I started out with this photo of a woman's sleeveless color blocked button shoulder dress. And made a girl version using the Oliver + S Roller Skate Dress. What can I say, I love color blocking!
When normally I'd sew my daughter a size 6, I went one size down, therefore a size 5 (and eliminated the Empire-waist elastic casing), but added 2 inches in length.
I added the one in-seam pocket using the pocket pattern from the Oliver + S Book Report Dress.
There are three buttons on each shoulder just like in the inspiration photo.
Have you ever done color blocking before? It's so much fun. I used the same method as Liesl shows in her color bocking 101 post.
I made a 60 degree angle line across the front of the dress pattern piece.
Then I cut along that line and when cutting out the fabric I added seam allowances along those new cut lines.
Be sure to check out all the other creations from the series.
There will be a sew-along with two prizes awarded at random from the submissions to the Knock it Off Flickr group. The prizes will be $100 and $50 gift certificates to Gold Star Tools.
Sunday, August 3, 2014
Ethan Shirt
Ashley and Emily over at Frances Suzanne are hosting another year of "Flip this Pattern”. Today I am kicking things off for the month of August with the SisBoom Ethan shirt. I’ve got two creations for you today, both an unflipped and a flipped one. First let’s start out with the unflipped version. I sewed one up by the pattern for my tween boy.
Over a year ago I was very inspired by this Sketchbook Shirt which was sewn by Cindy of Siestas and Sewing. I had to sew a similar one for my octopus loving son.
First off, here is some basic info about the Ethan Shirt for boys:
Sewing it up by the pattern, this project took me more than 4 hours. There are a ton of diagrams, but a few of them were incorrect and when you are a visual learner like me, this can become frustrating. I wonder how these mistakes get past the testers. Maybe I’m just super picky when it comes to the visuals.
There are lots of time consuming tedious steps: front pocket, front button placket, collar stand, collar, 2 sleeve plackets, cuffs, lots of pressing and gluing, topstitching on almost every piece (are you still with me?) So this project is not for the faint of heart!
At one point there were many layers of fabric I had to sew through, this was at a corner of the collar stand, trying to sew through all those layers I broke a needle! I found attaching the sleeves to be a bit tricky, they didn’t ease in as easily as I’d hope they would.
Once you follow this pattern and instructions you will have one very well made shirt which I think would meet the high standards of judges Patrick Grant and May Martin of the Great British Sewing Bee.
Another note, in my experience, most American sewing patterns use a 1/2” seam allowance and most European ones use a 3/8” seam allowance. This one it’s 1/4”.
With these instructions you have everything you need to know with the many step-by-step diagrams for a well-designed button shirt with collar stand. Having a collar stand was a huge thing for me, that’s what I was looking for in a button shirt and not all button shirt patterns out there have a collar stand.
The instructions show you how to do your very best sewing. Going through all the steps you notice the small details and I think you learn to respect the craftsmanship it entails.
During this whole project I was following the pattern with accuracy and consistency and doing my very best sewing. With the end result I have a huge sense of accomplishment.
At $10 for the pattern, it is a good value for your money.
Next up for my flipped version, I sewed a blue sleeveless dress with pleated skirt for C in size 6. The very full skirt makes for a very twirly dress!
I was inspired by this pin.
I took the shirt, made it into bodice and made it sleeveless by adding bias tape around the armholes.
I added a skirt with a lot of fabric, it has many pleats that all go the same direction all the way around the skirt.
And I added in-seam side pockets.
I found this tip and tutorial helpful: sew sharp collar points.
Last but not least, I have some more inspiration to share over at my button shirt inspiration Pinterest board.
Now go visit visit Frances Suzanne for a discount code for the Ethan Shirt, giveaways, the sew-along linky party...
Over a year ago I was very inspired by this Sketchbook Shirt which was sewn by Cindy of Siestas and Sewing. I had to sew a similar one for my octopus loving son.
First off, here is some basic info about the Ethan Shirt for boys:
- $10
- sizes 1-14 (most children's patterns go up to size 12, so what a bonus that this one goes all the way up to 14)
- 166 pages (each size is separate so that’s why there are 166 pages)
Sewing it up by the pattern, this project took me more than 4 hours. There are a ton of diagrams, but a few of them were incorrect and when you are a visual learner like me, this can become frustrating. I wonder how these mistakes get past the testers. Maybe I’m just super picky when it comes to the visuals.
There are lots of time consuming tedious steps: front pocket, front button placket, collar stand, collar, 2 sleeve plackets, cuffs, lots of pressing and gluing, topstitching on almost every piece (are you still with me?) So this project is not for the faint of heart!
At one point there were many layers of fabric I had to sew through, this was at a corner of the collar stand, trying to sew through all those layers I broke a needle! I found attaching the sleeves to be a bit tricky, they didn’t ease in as easily as I’d hope they would.
Once you follow this pattern and instructions you will have one very well made shirt which I think would meet the high standards of judges Patrick Grant and May Martin of the Great British Sewing Bee.
Another note, in my experience, most American sewing patterns use a 1/2” seam allowance and most European ones use a 3/8” seam allowance. This one it’s 1/4”.
With these instructions you have everything you need to know with the many step-by-step diagrams for a well-designed button shirt with collar stand. Having a collar stand was a huge thing for me, that’s what I was looking for in a button shirt and not all button shirt patterns out there have a collar stand.
The instructions show you how to do your very best sewing. Going through all the steps you notice the small details and I think you learn to respect the craftsmanship it entails.
During this whole project I was following the pattern with accuracy and consistency and doing my very best sewing. With the end result I have a huge sense of accomplishment.
At $10 for the pattern, it is a good value for your money.
Next up for my flipped version, I sewed a blue sleeveless dress with pleated skirt for C in size 6. The very full skirt makes for a very twirly dress!
I was inspired by this pin.
I took the shirt, made it into bodice and made it sleeveless by adding bias tape around the armholes.
I added a skirt with a lot of fabric, it has many pleats that all go the same direction all the way around the skirt.
And I added in-seam side pockets.
I found this tip and tutorial helpful: sew sharp collar points.
Last but not least, I have some more inspiration to share over at my button shirt inspiration Pinterest board.
Monday, July 28, 2014
Kids Clothes Week July 2014
Kids Clothes Week is done and I finished the two pairs of shorts that I had planned to make.
I got this Clever Charlotte Finch Shorts paper sewing pattern back in January and now I finally sewed up a pair. I love that there are buttons, but no buttonholes! Instead of the full pleats I made box pleats because I really like box pleats and liked how Jessica's turned out. These were made up in size 6 in khaki cotton twill. Khaki bottoms are required at school as part of the school uniform. Maybe she'll wear these on the first day of school...
The other pair of shorts I made were the Oliver + S Sunny Day Shorts. They are summer pajama shorts sewn up in size 10 in octopus fabric for my octopus loving son. Summer pajama shorts were much needed.
I'm on a shorts kick right now, next I want to sew myself some shorts using this pattern.
Wednesday, July 16, 2014
What I made out of one yard
...of Paint by Number Deer from Erin Michael's Lush Uptown line. I'm reorganizing by sewing studio this summer, going through everything, getting rid of what I'm done with, and figuring out what to do with some of the fabrics in my stash. It was quick and easy to decide what to sew from this fabric.
In order to get these 2 dresses to fit in one yard, I made the Oliver + S Popover Sundress in size 5 and for the Made by Rae Little Geranium Dress (which is 0-3 months) I made the skirt 34 inches wide instead of 44. I still can't believe I got 2 dresses out of only one yard! Plus the secondary fabrics (from my stash) were pretty minimal.
Two dresses sewn up in one day was just the sense of accomplishment I needed right now.
These will be donated to Dress A Girl Around the World. I hope they go to sisters, wouldn't they be super cute in these coordinating dresses?
Subscribe to:
Posts (Atom)