Pages
▼
Monday, December 31, 2012
Red Christmas Fairy Tale Dress
My daughter's Christmas dress got done just hours before it was worn, thankfully my son's Christmas outfit was completed in mid-October (you can find the Patchwork Blazer tutorial here). This was not the Christmas dress I originally had planned back here, that dress will have to wait for a future project.
THE PATTERN// Oliver + S Fairy Tale Dress, size 5, view A: a fitted dress, fully-lined, special-occasion dress with crinoline, a Peter Pan collar, tulip cap sleeves, tubular waistband, and front bow detail. It is given a 3 out of 4 scissors rating.
THE FABRIC// Deep red/maroon/bordeaux taffeta, although it looks almost purple in some photos, it doesn't look purple in real life. Deep red tulle for the crinoline and deep red cotton for the lining.
THE SEWING// I followed the pattern and instructions very faithfully. The only change was that I used a 9" invisible zipper instead of a 16" one (as I had bought all the materials months ago thinking I was going to sew a different dress), so the dress is a little tight to put on and take off. This is my 3rd time using this pattern. I first used the bodice for the Purpledicular Dress, then used the whole pattern view A for the Gabriella Dress Knock-Off, and now sewing it for the 3rd time I really think it should be given a 3.5 or 3.75 out of 4 scissors rating as all of those wonderful details are super duper time consuming. I'm not a huge fan of sewing collars, this one is OK. I'm also not a huge fan of sewing in those dreaded set-in sleeves, but these tulips cap sleeves are a dream to sew and the end result is absolutely lovely! This is the 2nd time I've sewn this dress with the sleeves and I think I need to adjust the bodice front where it attaches to the sleeves because she is so narrow in the shoulders.
FYI, the curls in her hair were achieved by using Curlformers, one of her Christmas gifts.
It had been way too long since I sewed something specifically for Christmas... way back in 2009 it was a green polka dot peasant dress with red & white striped knitted accessories.
The calendar is turning 2.0.1.3
May it be a year filled with fun sewing :)
Monday, December 17, 2012
Scandinavian Christmas 2012 Guest Post
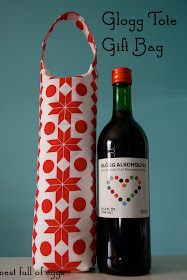
Today I am visiting Kathryn at the Pickled Herring for her Scandinavian Christmas 2012 series. Half of my ancestry is Swedish and I am sharing one of my ideas on how to have a more Scandinavian Christmas with a Glogg tote gift bag. Be sure to check out all the posts during the series.
Merry Scandinavian Christmas!
Thursday, December 13, 2012
Nordic Christmas 2012
From November through mid-January the American Swedish Institute (in Minneapolis, Minnesota) is decorated for a Nordic Christmas. They have a separate room for each of the 5 Scandinavian countries: Iceland, Finland, Denmark, Norway, and Sweden. This is how they decorated for Christmas 2012... if you are not able to make it in person, enjoy this photo tour...
Danish Christmas tree ornaments made out of paper!
Lots of inspiration to have a more Scandinavian Christmas.
If you liked this, you might be interested in my previous Scandinavian related posts:
:: Scandinavian Goodies
:: Norwegian Handknits: Heirloom Designs from Vesterheim Museum
:: St Lucia Knitted Crown
:: St Lucia Crown/Wreath Centerpiece
:: St Lucia Program (cardstock St Lucia crown and Model Magic Lucia buns)
:: St Lucia Smorgasbord
:: Scandinavian Books
:: Nordic Crosses Gift Wrap
:: Tomte Stuffy (from the Scandinavian Stitches book)
:: St Lucia Choir Concert
:: Scandinavian Christmas Fair
:: Nordic Christmas Decorations
:: Dala Horse Felt Crown
:: Sankta Lucia (little girl and doll dresses inspired by St Lucia)
:: Lingonberry Headband Tutorial
Happy St Lucia day today (December 13th)!
PS Be sure to check out starting today:
Scandinavian Christmas 2012 @ The Pickled Herring
Thursday, December 6, 2012
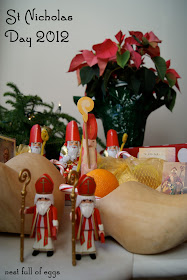
St Nicholas Day 2012
Happy Saint Nicholas day from our home to yours!
In case anyone is interested...
:: Wooden clogs came from my childhood when my parents visited the Netherlands, they brought these back for my older sister, older brother, and I.
:: Wood Saint Nicholas is from Ostheimer.
:: Plastic Saint Nicholas toys are from PLAYMOBIL.
:: Chocolate Saint Nicholas (learn how to change a chocolate Santa into Saint Nicholas) is from Lindt.
:: Gold foiled chocolate coins are from Trader Joe's.
:: Clementines and candy canes are from a regular grocery store.
:: Saint Nicholas prayer cards are from a Christian store.
St Nicholas day from previous years:
:: 2009
:: 2010
:: 2011
Friday, November 30, 2012
Button Banner Advent Calendar Tutorial
| This was originally posted on So You Think You're Crafty last week, bringing it home in case you missed it. |
Button Banner Advent Calendar Tutorial
We enjoy celebrating Advent with all 3 of our children. We have done all different types of Advent calendars which are countdown calendars where you count down the days until Christmas: pocket banner, paper cake, PLAYMOBIL in jars, but for this one I thought it would be nice to have one that isn't filled with a sugary treat, toy, etc. Today I'm going to show you how to make the Button Banner Advent Calendar which is quite simple to make, it is a banner that can be hung on the wall, and has 24 buttons that represent the first 24 days of December. The 2 felt poinsettia flowers button easily onto a button on the banner, so easy that a child can do it by themselves. The button becomes the center of the flower. The poinsettia flower is buttoned on the 1st button on December 1st. The poinsettia will make it's way down the banner until it is buttoned on the last button on December 24th. This is a very visual way for a child to see how much longer it is until Christmas.
Supplies needed:
:: 1 yard silver ironing board cover fabric (yes, you can buy this at the local fabric store by the yard)
:: white wool felt
:: scrap of white linen fabric
:: black fabric marker
:: button kit tools, Dritz #14 (it's a fabric button maker you can buy at the local fabric store)
:: 24 aluminum cover buttons, size 3/4"
:: silver glitter eyelash yarn
:: 2 ft wooden dowel
:: paint (optional if you want to paint the wooden dowel)
Step-by-step instructions:
Take the one yard of silver ironing board cover fabric, cut it in half lengthwise, pin right sides together. Sew 1/2" seams around 3 sides.
Cut the 2 bottom corners, turn right side out, press with iron. At the top of the banner (where there is the opening), fold over 1" & press with iron.
Then fold over 3" & press with iron.
Topstitch at the 3 inches, you’ve just created a casing so that you can hang the banner on the wall.
Now it's time to make the 24 fabric buttons. Using the button pattern and a disappearing ink marker, trace the button pattern 24 times.
Now cut out the 24 circles of fabric.
To make a fabric button, place the cut fabric circle on top of the mold. Place the button shell on top, then push the button shell down into mold.
Tuck fabric into button shell.
Place back over tucked fabric.
Press down firmly with pusher to snap into place.
Remove button from mold.
Repeat this until all 24 buttons are made.
With the black fabric marker, write the numbers 1-24 on the fabric buttons.
With a marking pen, mark the placement of the 24 buttons on the banner. All buttons are equally spaced apart. The grouping of buttons is 4 across & 6 down, center this grouping of buttons on the banner. Then sew on by hand the 24 buttons.
Make 2 poinsettia patterns by drawing tear drop shaped flower petals. The large one measures about 6"X5", has 6 points and the smaller one measures about 3.25"X2.75", has 5 points.
Using the 2 poinsettia patterns, cut these pieces out of felt.
Cut a button hole in the center of each of them, large enough to button a 3/4" button.
Place the smaller poinsettia on top of the larger one. Now the poinsettia is ready to be buttoned on the banner. Button the poinsettia flower on the 1st button on December 1st. The poinsettia will make it's way down the banner until it is buttoned on the last button on December 24th.
You can paint the 2 ft dowel if you'd like. Slide dowel through the banner casing and attach enough yarn for it to be hung. Tie a piece of silver glitter eyelash yarn to the dowel to hang down each side of the banner.
You can have fun with this by making the banner in different types of fabrics and/or colors, for example how about making one in a raspberry pink color with a white felt poinsettia. Or a traditional Christmas color one in green fabric with a red poinsettia (like the example in the photos which is made out of green corduroy). Also another idea is to sew trim around the 3 sides of the banner, try pompom trim, ribbon, lace…
Tomorrow is December 1st so get ready to start counting down the days until Christmas with Advent calendars, I know my kids are really excited :)


